好像是忙了很多,不知道是懒了?好像是懒了。不怎么去思考了,也不怎么爱读了,总想无所事事的发呆。
二〇一六年,重要的,要谈谈什么。
这一年,终于,成为了一个北漂。和想象中的也不太一样,没有那么简单,一切都是从头开始,也没有那么困难,有一群真挚的朋友。终究是新的环境,面临着各种抉择和挑战,有关能力,有关事业,有关未来,也会迷茫。
这一年,体会到,人生,无论是做人,还是生活,都没那么容易,开始慢慢变得现实。有时候会回忆,思考曾经的一些选择是不是正确,由梦想主义的思考方式,变得理想,最后成为现实主义式的去选择。
这一年,不断的想,自己到底喜欢什么,能做什么,要做什么。好像变得有些胆怯了,害怕选择错误,害怕走弯路,尽管知道,自己还需要挫折的磨练。
不得不说,性格还在不断的变化。用自恋的话,正在学着更包容,更理性。以前特别容易冲动,某个决定,某个行为,可能一瞬间就做了出来。
因为爱情,开始郑重考虑、调整自己的发展,平衡家庭和事业。
感谢二〇一六有你,感谢二〇一七有你,感谢此生有你。
关于爱情,我试着找一些话去描述这份美好,却不想太坦白,爱情很简单,我会用行动温暖,执子之手,与子偕老,陪伴会是最长情的告白。
我曾把二〇一五年留给了自己,关于二〇一七,属于你我,家庭、事业。
有幸看节目关于玩儿一辈子和拼一辈子那个重要听到于老师这样说:玩儿是一种心态,玩儿好了就是拼,这种东西是不能分开的,因为你的事业如果想干好,你要下功夫,那么如果你要有一种玩的心态的话,你下的功夫你不觉得苦,如果你要没有爱好作为基础的话,你这下的功夫,永远是吃不尽的苦,到最后你还得不到,因为你并不喜欢它。
当初听到这些话的时候感触蛮深,适合自己的就是最好的。
新的一年,完成未完的篇章,开启全新的篇章。
在一起,我们携手同行。
Python学习开发过程的小愉快
小愉快1:
在Python中,判断在某些条件下给变量赋值一句代码就能搞定:1multiple = 1024 if aTrue else 1000
在其他语言中:12345multiple = 1if a_kilobyte_is_1024_bytes: multiple = 1024else: multiple = 1000
很简洁,有没有?哈呼。
Pod制作公共库时遇到的问题
to find a pod with name, author, summary, or descriptionmatching ‘SKMoviePlayer’``` 1234
关于发布代码到CocoaPods(Trunk方式)上,就不多说了,可以看官方文档,看不懂的话网上有很多手把手教程。当时我用 pod trunk 注册账户的时候,由于选择的用户名和github.com上面的不一致,导致发布之后搜索 SKMoviePlayer 库的时候一直出现文章开头的错误 ```(Unable to find a pod with name, author, summary, or descriptionmatching ‘SKMoviePlayer’)```。于是,我就把帐号和邮箱改成和github上面的帐号信息一致了。过程如下:### 首先执行了```pod trunk me``` 信息如下(与github上面的仓库帐号不一致):
|
|
bogon:~ Leou$ pod trunk me
- Name: Leou
- Email: wly314sdx@qq.com
- Since: August 19th, 03:20
- Pods:
- SKMoviePlayer
- Sessions:
- August 19th, 03:20 - December 25th, 04:46. IP: 119.57.115.175 Description: MacBook
Pro - August 21st, 20:34 - December 27th, 20:44. IP: 119.57.115.175123### 执行 ```pod trunk register --help``` 看看有什么能改本地信息的么:If you’ve already registered with trunk, you may omit the `NAME`(unless you would like to change it)。所以我们可以通过```$ pod trunk register eloy@example.com```命令更改账户,那么好,去注册一个与github用户名一样的账户。
- August 19th, 03:20 - December 25th, 04:46. IP: 119.57.115.175 Description: MacBook
bogon:desktop Leou$ pod trunk register –help
Usage:
$ pod trunk register EMAIL [NAME]

  Register a new account, or create a new session.

  If this is your first registration, both an `EMAIL` address and your `NAME` are required. If you’ve already registered with trunk, you may omit the `NAME`
(unless you would like to change it).
It is recommended that you provide a description of the session, so that it will be easier to identify later on. For instance, when you would like to clean-up
your sessions. A common example is to specify the location where the machine,
that you are using the session for, is physically located.
Examples:

    $ pod trunk register eloy@example.com 'Eloy Durán' --description='Personal Laptop'
    $ pod trunk register eloy@example.com --description='Work Laptop'
    $ pod trunk register eloy@example.com
|
|
pod trunk register 783459987@qq.com ‘wly314’ –description=’MacBook Pro’12成功之后,去邮箱验证,这一步是为了注册另一个账户,然后就可以切换到新建的账户上。之后就可以执行```pod trunk register 783459987@qq.com```重新建立本地会话,验证邮箱之后,执行```pod trunk me```信息如下:
bogon:desktop Leou$ pod trunk me
- Name: wly314
- Email: 783459987@qq.com
- Since: August 21st, 20:28
- Pods:
- SKMoviePlayer
- Sessions:
- August 21st, 20:28 - December 27th, 20:34. IP: 119.57.115.175
- August 21st, 21:36 - December 27th, 21:36. IP: 119.57.115.175 Description: MacBook Pro123OK,问题解决到现在就快差不多了,本地已经没什么问题,现在更改仓库的 Owner。### 更改仓库 Owner:#### 看看现在仓库的Owner:目前属于```Leou```账户。
bogon:SKMoviePlayer Leou$ pod trunk info SKMoviePlayer
SKMoviePlayer
- Versions:
  - 0.0.2 (2016-08-19 09:27:39 UTC)
  - 0.0.3 (2016-08-19 09:55:45 UTC)
  - 0.0.4 (2016-08-19 10:46:17 UTC)
  - 0.0.5 (2016-08-22 02:40:34 UTC)
- Owners:
  - Leou <wly314sdx@qq.com>
|
|
bogon:desktop Leou$ pod trunk add-owner SKMoviePlayer 783459987@qq.com
- Owners:
- Leou wly314sdx@qq.com
- wly314 783459987@qq.com1#### 删除```Leou```账户:```+ remove-owner Remove an owner from a pod
如下我们可以看到1234```bogon:desktop Leou$ pod trunk remove-owner SKMoviePlayer wly314sdx@qq.com - Owners: - wly314 <783459987@qq.com>
最后更新一下 SKMoviePlayer 文件:
如下:12345678910111213141516171819202122232425Pod::Spec.new do |s| s.name = "SKMoviePlayer" s.version = "0.0.7" s.summary = "SKMoviePlayer一个在完善中的播放器-基于AVPlayer" s.description = <<-DESCSKMoviePlayer一个在完善中的播放器-基于AVPlayer必须是addSubview添加播放器SKMoviePlayer。 DESC s.homepage = "https://wly314.github.io" s.license = "MIT" s.author = { "wly314" => "783459987@qq.com" } s.platform = :ios, "7.0" s.source = { :git => "https://github.com/wly314/SKMoviePlayer.git", :tag => "0.0.7" } s.source_files = "SKMoviePlayer", "*.{h,m}" s.resources = 'SKMoviePlayer/SKImages/*.{png,jpg}' s.requires_arc = trueend
OK,现在问题已经解决。搜索一下库pod search SKMoviePlayer,可以看到,搜索已经成功。
App重构计划
简单的是语言,深层地做研究,别让程序打败了自己。
1. 第三方库管理
CocoaPods 管理第三方库。第三方库以每个大的版本号为一次稳定版本,当前项目使用稳定版本,如果第三方库有大版本升级,则可以根据项目是否对第三方库进行升级。
|
|
项目中使用以下第三库:123456AutoLayout布局管理: Masonry,本次使用版本2.0以下版本。数据请求: AFNetworking,本次使用版本2.0以下版本。网络图片加载与缓存: SDWebImage,本次使用版本2.0以下版本。下拉刷新、上拉加载: MJRefresh,本次使用版本2.0以下版本。数据库: FMDB,本次使用版本2.0以下版本。网络加载指示器 MBProgressHUD,本次使用版本2.0以下版本。
Podfile 如下:
|
|
2. 代码规范
代码规范参照以下标准:
代码规范
1. 命名规则:
a) 类名首字母大写,方法首字母小写,方法中的参数首字母小写。所有命名采用驼峰命名法。
b) 所有命名不允许与系统参数命名一致,例如:1UITableView *tableView。
c) 宏定义命名大写字母,能直观表达出宏定义的含义,单词之间以下划线隔开,例如:1#define DISPATCH_SOURCE_TYPE_TIMER。
d) 命名禁止使用单字母,应该尽量能表达变量含义,而且要有注释解释说明。
e) 私有变量的声明命名。
f) 全局变量的声明命名。
g) 方法的声明命名。
h) 资源命名规则:见第5条。
2. 注释
a) 所有的需要注释的地方:类文件的解释,变量或参数的解释,方法的解释,宏定义的解释,代码逻辑的解释等。
b) #pragma mark - 或者 // MARK: 标记分类。
c) 所有注释尽量采用代码块注释:/* 这样的注释 /。
d) 解释类注释必须采用代码块注释。例如:方法名解释,版权解释,类解释,变量或参数解释等。
e) 对OC:私有变量或方法的声明一律写进实现文件.m中。
f) 推荐使用插件:VVDocumenter-Xcode
3. 对齐、换行与缩进
a) {}:{ 跟在外部代码后面的,内部代码与上 { 之间保持一个换行。{ 与外部代码另起一行的,内部代码不必另起一行。{}
b) 代码块与代码块之间,必须保持换行(空一行或两行),不允许出现从上到下一堆。
c) @关键字与代码保持空一行。
d) 所有代码必须保持对齐。
4. 空格
a) 运算符前后必须加空格。
b) 多参数,每个参数的逗号后必须加空格,例如:time(x, y)。
c) 星号 与类型必须有一个空格,与变量之间无空格,例如:NSString str。
5. 资源命名规则
资源命名全部使用小写字母,单词之间以下划线分隔,应能充分表达意思,以前缀区分资源,防止重名,以后缀区分资源类型(比如图片正常状态,高亮状态等)。
6. 编码
保证每一行代码都要简洁、明了:
不提倡非规范代码:
|
|
提倡规范代码:
|
|
模块化开发
代码尽可能功能模块化,所有代码文件保证1000行代码之内。
封装:把模块化的功能全部封装出来,封装时要注意,只处理功能效果,不负责业务逻辑处理。
获取图片像素信息
|
|
CocoaPods
参考:
http://www.cnblogs.com/wayne23/p/3912882.html.
OS X系统已经安装过Ruby了,因此我们只需执行以下命令:1sudo gem install -n /usr/local/bin cocoapods
由于某些原因,执行时会出现下面的错误提示:
12ERROR: Could not find a valid gem 'cocoapods' (>= 0), here is why: Unable to download data from https://rubygems.org/ - Errno::EPIPE: Broken pipe - SSL_connect (https://rubygems.org/latest_specs.4.8.gz)
可以多试几次,或者使用淘宝的代理,执行以下命令。1234$ gem sources -l$ gem sources --remove https://rubygems.org/$ gem sources -a https://ruby.taobao.org/$ gem sources -l
然后重新安装:1sudo gem install -n /usr/local/bin cocoapods
|
|
|
|
iOS 从绘图开始:DrawRect&CoreText
|
|
上面的代码,是在UIView上绘制一个圆形比例图和文字。
下面是CoreText在Label上的使用。123456789101112UILabel *titleLabel = [[UILabel alloc] initWithFrame:CGRectMake(60, 2, sectionHeader.bounds.size.width-60-15-10, 56)];titleLabel.font = [UIFont systemFontOfSize:17.0f];[sectionHeader addSubview:titleLabel];NSString *titleStr = [NSString stringWithFormat:@"你还有%ld未通过", courseCount];NSInteger courseCount = [obligatoryCourseArray count]; // 设置标签文字 NSMutableAttributedString *attrituteString = [[NSMutableAttributedString alloc] initWithString:titleStr];// 设置标签文字的属性[attrituteString setAttributes:@{NSForegroundColorAttributeName : [UIColor redColor], NSFontAttributeName : [UIFont systemFontOfSize:25]} range:NSMakeRange(3, [NSString stringWithFormat:@"%ld", courseCount].length)];// 显示在Label上 titleLabel.attributedText = attrituteString;
当然Label上绘制的Text的属性可以用上面的在UIView上绘制中的方法。
再来看一个UIImageView的:123456789101112131415161718192021222324252627282930313233343536373839404142434445464748495051525354555657585960616263646566676869707172737475{ UIImageView *obligatoryImageView = [[UIImageView alloc] initWithFrame:CGRectMake(0, 30, tableView.bounds.size.width, ([UIScreen mainScreen].bounds.size.height-20-44)/3-30*2)]; [cell addSubview:obligatoryImageView]; obligatoryImageView.backgroundColor = [UIColor whiteColor]; UIGraphicsBeginImageContext(obligatoryImageView.bounds.size); [obligatoryImageView.image drawInRect:CGRectMake(0, 0, obligatoryImageView.bounds.size.width, obligatoryImageView.bounds.size.height)]; CGContextSetLineCap(UIGraphicsGetCurrentContext(), kCGLineCapRound); //边缘样式 CGContextSetLineWidth(UIGraphicsGetCurrentContext(), 0.2); //线宽 CGContextSetAllowsAntialiasing(UIGraphicsGetCurrentContext(), YES); CGContextSetRGBStrokeColor(UIGraphicsGetCurrentContext(),153/255.0,153/255.0,153/255.0,1.0); //颜色 CGContextBeginPath(UIGraphicsGetCurrentContext()); CGContextMoveToPoint(UIGraphicsGetCurrentContext(), 35, 5); //起点坐标 CGContextAddLineToPoint(UIGraphicsGetCurrentContext(), self.view.bounds.size.width-35, 5);//终点坐标 CGContextAddLineToPoint(UIGraphicsGetCurrentContext(), self.view.bounds.size.width-35, (obligatoryImageView.bounds.size.height-5)); CGContextAddLineToPoint(UIGraphicsGetCurrentContext(), 35, (obligatoryImageView.bounds.size.height-5)); CGContextAddLineToPoint(UIGraphicsGetCurrentContext(), 35, 5); CGContextAddLineToPoint(UIGraphicsGetCurrentContext(), 35, (obligatoryImageView.bounds.size.height-5)/5+5); CGContextAddLineToPoint(UIGraphicsGetCurrentContext(), self.view.bounds.size.width-35, (obligatoryImageView.bounds.size.height-5)/5+5); CGContextAddLineToPoint(UIGraphicsGetCurrentContext(), self.view.bounds.size.width-35, (obligatoryImageView.bounds.size.height-5)/5*2+5); CGContextAddLineToPoint(UIGraphicsGetCurrentContext(), 35, (obligatoryImageView.bounds.size.height-10)/5*2+5); CGContextAddLineToPoint(UIGraphicsGetCurrentContext(), 35, (obligatoryImageView.bounds.size.height-10)/5*3+5); CGContextAddLineToPoint(UIGraphicsGetCurrentContext(), self.view.bounds.size.width-35, (obligatoryImageView.bounds.size.height-10)/5*3+5); CGContextAddLineToPoint(UIGraphicsGetCurrentContext(), self.view.bounds.size.width-35, (obligatoryImageView.bounds.size.height-10)/5*4+5); CGContextAddLineToPoint(UIGraphicsGetCurrentContext(), 35, (obligatoryImageView.bounds.size.height-10)/5*4+5); CGContextStrokePath(UIGraphicsGetCurrentContext()); obligatoryImageView.image=UIGraphicsGetImageFromCurrentImageContext(); UIGraphicsEndImageContext(); NSArray *obligatoryArray = [courseArray objectAtIndex:indexPath.row]; UILabel *titleLabel = [[UILabel alloc] initWithFrame:CGRectMake(0, 0, tableView.bounds.size.width, 30)]; titleLabel.textColor = [UIColor murpTextLowColor]; titleLabel.textAlignment = NSTextAlignmentCenter; titleLabel.font = [UIFont systemFontOfSize:15.0f]; titleLabel.text = [[obligatoryArray objectAtIndex:0] objectForKey:@"Extend2"]; [cell addSubview:titleLabel]; for (int i = 0; i <= 5; i ++) { UILabel *left1 = [[UILabel alloc] initWithFrame:CGRectMake(0, 30+(obligatoryImageView.bounds.size.height-10)/5*i, 35, 10)]; left1.textColor = [UIColor murpTextLowColor]; left1.textAlignment = NSTextAlignmentRight; left1.font = [UIFont systemFontOfSize:12.0f]; left1.text = [NSString stringWithFormat:@"%d%%", 100-20*i]; [cell addSubview:left1]; if (i < obligatoryArray.count-1) { UILabel *down = [[UILabel alloc] initWithFrame:CGRectMake(35+(tableView.bounds.size.width-35*2)/5*i, ([UIScreen mainScreen].bounds.size.height-20-44)/3-30, (tableView.bounds.size.width-35*2)/5, 30)]; down.textColor = [UIColor murpTextLowColor]; down.textAlignment = NSTextAlignmentCenter; down.font = [UIFont systemFontOfSize:12.0f]; [cell addSubview:down]; down.text = [NSString stringWithFormat:@"%@分",[[obligatoryArray objectAtIndex:i+1] objectForKey:@"Extend1"]]; CGFloat heights = [[[obligatoryArray objectAtIndex:i+1] objectForKey:@"Extend3"] floatValue]/100.0*(obligatoryImageView.bounds.size.height-5*2); UIImageView *heightImageView = [[UIImageView alloc] initWithFrame:CGRectMake(35+(tableView.bounds.size.width-35*2)/5*i+5, (([UIScreen mainScreen].bounds.size.height-20-44)/3-30-5)-heights, (tableView.bounds.size.width-35*2)/5-10, heights)]; heightImageView.backgroundColor = [UIColor murpThemeGreenColor]; [cell addSubview:heightImageView]; UILabel *heightsLabel = [[UILabel alloc] initWithFrame:CGRectMake(35+(tableView.bounds.size.width-35*2)/5*i+5, (([UIScreen mainScreen].bounds.size.height-20-44)/3-30-5)-heights-20, (tableView.bounds.size.width-35*2)/5-10, 20)]; heightsLabel.textColor = [UIColor murpTextLowColor]; heightsLabel.textAlignment = NSTextAlignmentCenter; heightsLabel.font = [UIFont systemFontOfSize:10.0f]; [cell addSubview:heightsLabel]; heightsLabel.text = [[obligatoryArray objectAtIndex:i+1] objectForKey:@"Extend2"]; } } }
看一眼效果图: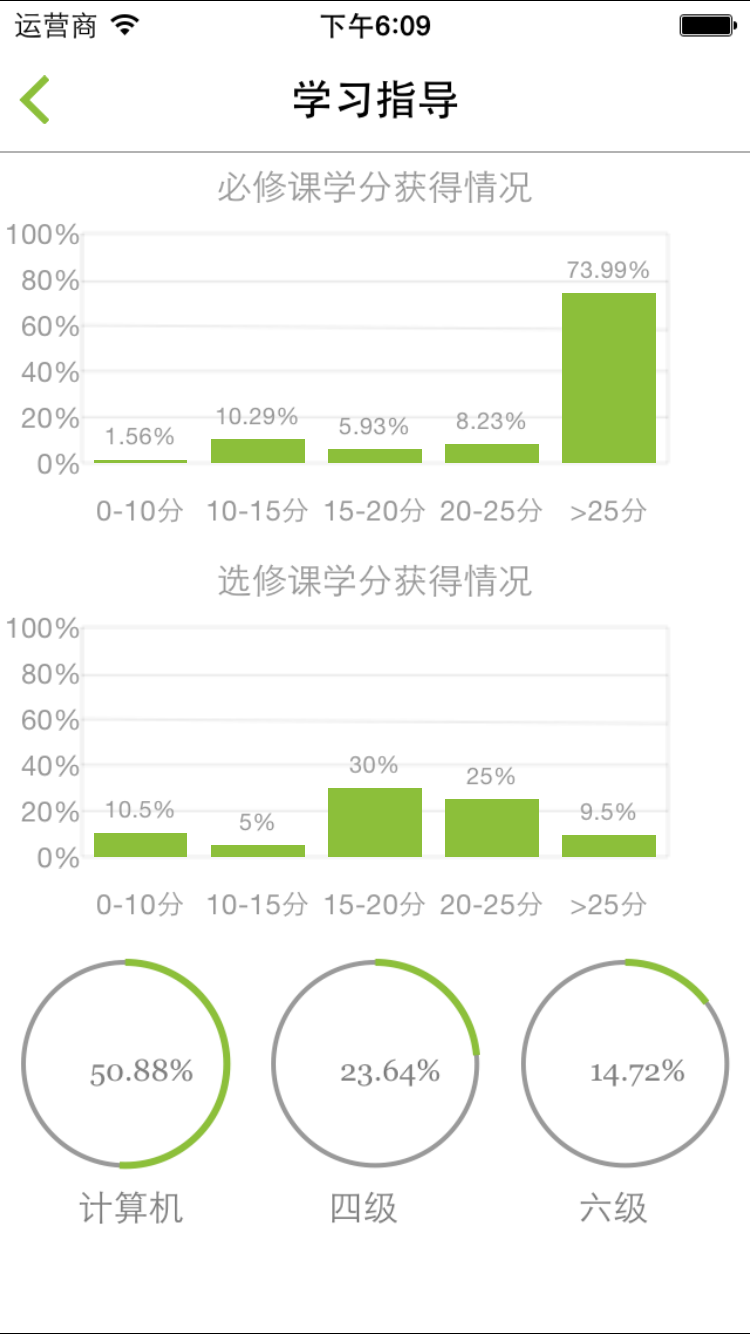
iOS设置导航与其标题的颜色及字体大小和系统默认TabBar的相关设置与使用方法
第一步:1234567891011121314//在info.plist中添加一个字段:view controller -base status bar 设置为NO;//导航颜色[[UINavigationBar appearance] setBarTintColor:[UIColor XXXX]];[[UITableViewCell appearance] setBackgroundColor:[UIColor XXXX]]; //设置状态栏(信号区)白色[[UIApplication sharedApplication] setStatusBarStyle:UIStatusBarStyleDefault]; //默认带有一定透明效果,可以使用以下方法去除系统效果[navigationController.navigationBar setTranslucent:NO]; //更改导航标题字体大小与颜色要在第一级页面设置 如下// 设置导航默认标题的颜色及字体大小self.navigationController.navigationBar.titleTextAttributes = @{UITextAttributeTextColor: [UIColor whiteColor], UITextAttributeFont:[UIFont boldSystemFontOfSize:18]};
第二步:
//UIImageRenderingModeAlwaysOriginal 让图片表现的模式为图片的原始样式 用于去掉系统添加的颜色
self.tabBarController.tabBarItem.title = @"title";
if ([[UIDevice currentDevice] systemVersion].floatValue >= 7.0) {

[self.tabBarController.tabBarItem setFinishedSelectedImage:[[UIImage imageNamed:@"Image.png"] imageWithRenderingMode:UIImageRenderingModeAlwaysOriginal] withFinishedUnselectedImage:[[UIImage imageNamed:@"ImageS.png"] imageWithRenderingMode:UIImageRenderingModeAlwaysOriginal]];
}else{
[self.tabBarController.tabBarItem setFinishedSelectedImage:[UIImage imageNamed:@"Image.png"] withFinishedUnselectedImage:[UIImage imageNamed:@"ImageS.png"]];
}
//tabbar颜色 用于更改字体颜色
[self.tabBarController.tabBar setTintColor:[UIColor XXXX]];
Demo地址:
This is https://github.com/wly314/HappyTravel.
欢迎交流。
Hello World
Welcome to Hexo! This is your very first post. Check documentation for more info. If you get any problems when using Hexo, you can find the answer in troubleshooting or you can ask me on GitHub.
Quick Start
Create a new post
|
|
More info: Writing
Run server
|
|
More info: Server
Generate static files
|
|
More info: Generating
Deploy to remote sites
|
|
More info: Deployment